Uploading Data
This page provides instructions for uploading data to DANDI after you have created a Dandiset and converted your data to NWB format.
Prerequisites
Before uploading data to DANDI, ensure you have:
- Created a Dandiset on DANDI
- Converted your data to NWB format
- Validated your NWB files to ensure they meet DANDI's requirements
- Installed the DANDI Client:
pip install -U dandi - Set up your API key (see Storing Access Credentials below)
Technical limitations
- File name/path: There is a limit of 512 characters for the full path length within a dandiset.
- Volume and size: There is a limit of 5TB per file. We currently accept any size of standardized datasets, as long as you can upload them over an HTTPS connection. However, we ask you contact us if you plan to upload more than 10TB of data.
Upload Methods
DANDI provides two main methods for uploading data:
1. Using NWB GUIDE
The NWB GUIDE provides a graphical interface for uploading data to DANDI. See the NWB GUIDE Dataset Publication Tutorial for more information.
2. Using the DANDI CLI
For command-line users or those with larger datasets, the DANDI CLI provides a powerful way to upload data:
- Download the Dandiset locally
dandi download https://dandiarchive.org/dandiset/<dataset_id>/draft cd <dataset_id> - Organize your data (skip this step if you are preparing a proper BIDS dataset with e.g. OME-Zarr, NWB and other files):
dandi organize <source_folder> -f dry # Dry run to see what would happen dandi organize <source_folder> # Actually organize the files - Validate your data
dandi validate . - Upload your data
To upload to the development server, use:
dandi uploaddandi upload -i dandi-sandbox
Storing Access Credentials
There are two options for storing your DANDI access credentials:
1. DANDI_API_KEY Environment Variable
- By default, the DANDI CLI looks for an API key in the
DANDI_API_KEYenvironment variable. To set this on Linux or macOS, run:
export DANDI_API_KEY=personal-key-value
-
Note that there are no spaces around the "=".
-
If your
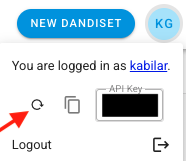
DANDI_API_KEYneeds to be reset (for example, because it was publicly exposed), you can cycle your API key by following the instructions below: -
Log in to DANDI Archive
- Click on your user initials in the top-right corner
- Click the circular arrow

2. keyring Library
If the DANDI_API_KEY environment variable is not set, the CLI will look up the API key using the keyring library, which supports numerous backends, including the system keyring, an encrypted keyfile, and a plaintext (unencrypted) keyfile.
Specifying the keyring backend:
You can set the backend the keyring library uses either by setting the PYTHON_KEYRING_BACKEND environment variable or by filling in the keyring library's configuration file.
IDs for the available backends can be listed by running keyring --list.
If no backend is specified, the library will use the available backend with the highest priority.
Storing the API key with keyring:
You can store your API key where the keyring library can find it by using the keyring program: Run keyring set dandi-api-dandi key and enter the API key when asked for the password for key in dandi-api-dandi.
If the API key isn't stored in either the DANDI_API_KEY environment variable or in the keyring, the CLI will prompt you to enter the API key, and then it will store it in the keyring.
Troubleshooting
If you encounter issues during the upload process:
- Ensure your NWB files pass validation (see Validating NWB Files)
- Check that you're using the latest versions of
dandi,PyNWB, andMatNWB
If you continue to have issues, please reach out via the DANDI Help Desk.
Debugging the DANDI CLI
If something goes wrong while using the Python CLI client, the first place to check for more information so that you can file a quality bug report is the logs. Every command records a copy of its logs in a logfile, the location of which is reported to the user when the command finishes running. The location of the logs varies by platform, e.g.:
- Linux:
~/.cache/dandi-cli/logor$XDG_CACHE_HOME/dandi-cli/log - macOS:
~/Library/Logs/dandi-cli
Logs are named with a combination of the time at which the dandi command
started running and the process ID of the command.
Recent versions of the client include all possible debugging information in the
logs, but if you're using an older version, only log messages that were printed
to the user when the command ran are recorded. As a result, in order to get
complete debugging information, you may have to rerun the problematic command,
this time increasing the logging level by passing -l DEBUG or --log-level
DEBUG on the command line. Note that this option goes between the main
dandi command and the name of the subcommand:
# Right:
dandi -l DEBUG upload

# Wrong:
dandi upload -l DEBUG
In addition, many commands can be put into a developer-specific mode for
showing raw progress information instead of fancy progress bars. For the
delete, organize, upload, and validate commands, this can be done by
setting the DANDI_DEVEL environment variable and passing --devel-debug to
the command:
DANDI_DEVEL=1 dandi upload --devel-debug
For the download command, the equivalent is the -f debug/--format debug
option:
dandi download -f debug
More advanced users who are familiar with the Python
debugger can instruct the client to
automatically open the debugger if any errors occur by supplying the --pdb
option to the command. Like the -l/--log-level option, the --pdb option
must be placed between dandi and the name of the subcommand.